 |
| Can you believe it!?! Takes only 2 sheets: 1 card stock and 1 B&T!
Look at these beautiful boxes my sister made! Denise really 'threw herself' and they turned out sweet! She found the box at Dawn's Stamping Studio. So thanks to Dawn!
What I love the most is that Close to My Heart Border and Texture paper in Lucy and Pemberly take the same box and make them look soooo different! Love it! Not to be outdone, I HAD to make one! I used Stella paper and sunset card stock. Wait-Sunset card stock? If you look closely at the picture below the card stock is Colonial White. That's because I goofed up when I cut the sunset cs and so I decide to move to Colonial White in case I goofed again.
Mine turned out pretty good but I like my sister's better! LOL! I think popping the different layers of the flowers up added so much! I also think I'd have liked mine better in Sunset cs!
Okay...so are you ready to join the fiesta and make your own box? Well, grab a glass of your favorite beverage, 1 sheet of card stock, 1 sheet of B&T, your favorite glue/sticky tape, scissors, score tool, and paper cutter. Here you go!!
Cut card stock and paper as follows:
(1) 7 1/2" x 10" Card Stock piece (save the rest for the flower)
(1) 1"x 11" for the belly band
(6) 1 1/ 8" x 2 3/8" Border & Texture paper of your choice
(4) 2 3/8" x 2 3/8" Border & Texture paper
Cricut Cuts: Art Philosophy
Card stock cuts of Flower 8 @ (1) 2" height, (1) 3" hight
1 B&T cut of Flower 7 or if you want a pointy flower use Snowflake 1 @ 2.6 to 2.75 depending on how big you want the middle layer. Cut extra if you want more layers.
Box Assembly
Take card stock base and score on the 10" side @ 1 1/4", 2", 3 3/4", 6 1/4", 8" and 8 3/4"
Turn card stock so the 7 1/2" base is at the top of your scoring tool and score @ 2 1/2" & 5"
Fold all your score lines.

When you finish you'll fold all the cut little "doors" up on score lines that weren't cut.
Now fold up the center noted in the picture above to make the box. Add a strong tape adhesive to the edges of the card stock as shown in this picture below. I put adhesive on each flap edge. You can see on one side I added it to the outside edge and the other I put it on the inside edge to add strength. 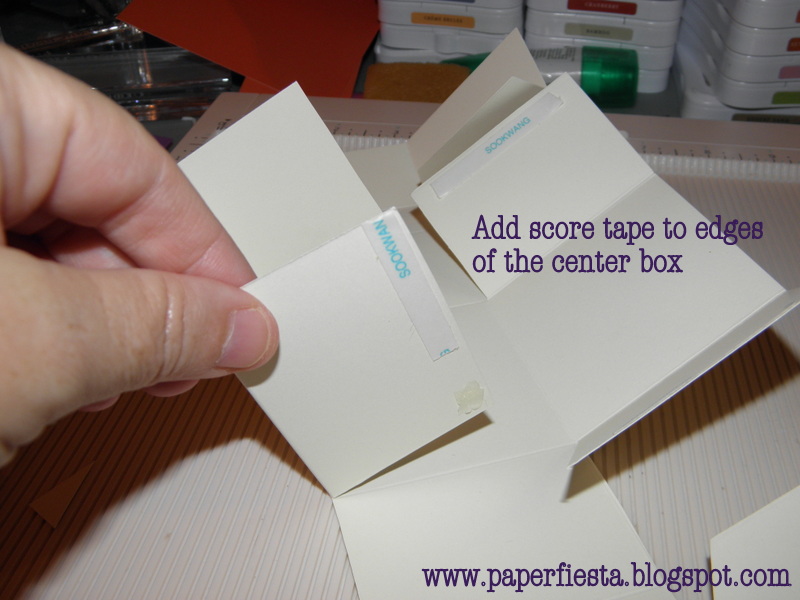 
You have all the hard stuff done! Now you just glue all your B&T papers on each of the faces of the box. I added a couple extra so no sides would be undecorated. It should look like this when completed.

Now just put the long belly band strip around the box and adhere the ends. This covers the open edges where the sides come up. Don't pull too tight! You have to have some slack so you can slide it off easily. Then create your flower by layering your flower pieces cut from the Art Philosophy cartridge. I used Liquid Glass to adhere mine and added a medium sized Durables Round (z1706) for the center of my flower. Use foam tape or scrap of chipboard if you want more space between the layers, like my sister had on her box.
Flower Power
Denise's flowers and mine have Flower Power! We each took our embossing stylus and rubbed over the entire flower to soften the card stock. We then took our bone folders and added veins in the flowers and curled the edges a bit, just like you would curly ribbon! I also inked the edges of my box and each of the flower layers with Chocolate ink. I also added some Sunset ink to match the paper but adds a bit of highlight to the petals.

This was a long one but hopefully you'll enjoy making this cute little 2 sheet box! I'd love to see the boxes you make! Go to my FaceBook page and add your pics to the album I've set up there.
As always, I am a Close To My Heart Independent Consultant and I would love to earn your business! Click on the link at the top of the page to go to my website and order. All orders are supported with help so you USE your products! I can Skype or Face Time with any long distance customer and help you with your projects!
Party on Paper Lovers! ~Sharon
|
Friday, August 10, 2012
Cute 2 sheet box tutorial

Subscribe to:
Post Comments (Atom)
No comments:
Post a Comment