Thanks so much for joining the Damask Diva Tommy or Later Sk8r Blog Hop! If you are coming from Tracy William's blog then you are in the right place! If you joined the hop because you are one of my followers, you won't want to miss ANY of the great projects so I recommend you click here to get the entire list of participants on the Damask Diva blog. A great place for inspiration from the team led by the fabulous Mandy Leahy!
I was so excited about this month's hop and knew exactly what I was going to do with the Tommy Paper Pack which has a nautical theme! But then time got away from me and that project had to go on hold {tear} So instead, I decided to make a Later Sk8r card with one of my favorite A-size stamps!

 I wanted to give some dimension to the cat so I stamped the image 3 times. Twice on the dotted paper{Shhh! Don't tell anyone! That paper comes from the Claire Paper Pack} and one time on the plaid paper. Then I fussy cut the images out and layered them. You'll notice I have 2 layers on the body and the third layer is the nose! These were popped up with our fabulous foam tape. I like the tape for just this kind of project where I need really small pieces and a few really long ones to add stability. I used a marker to color in the nose and collar and a small sparkle for the charm.
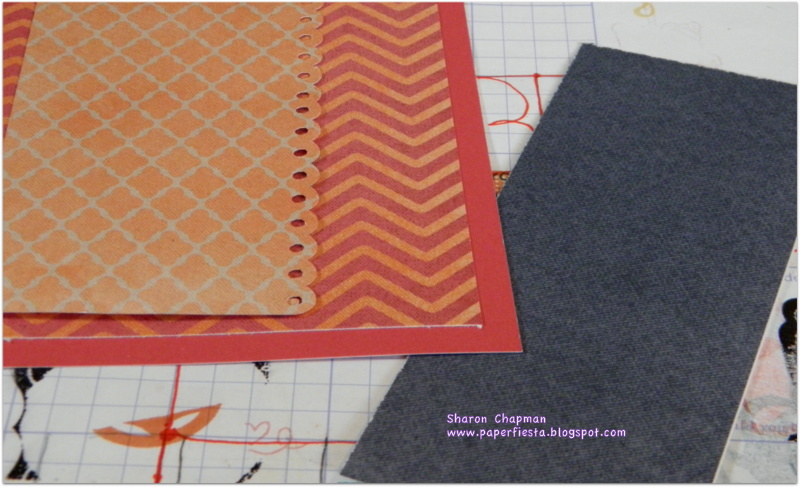
 Normally I wouldn't talk a lot about the card base but I think this one is pretty cool! All of it comes from the Later Sk8r paper pack! The top strip is the Outdoor Denim card stock~which is another thing I love about our paper packs-no guessing! The card stock that coordinates is right in the pack! The middle strip is the zip strip from one of the sheets but I actually cut it wider than the strip so it included some of that beautiful blue. The bottom is another texture paper which looks like the metal groves from inside a truck bed or some tool boxes. Finally the slate and pear pieces that were layered on top are at the size. I cut the circle using my Cricut Art Philosophy{heart}and CCR. I cut the circle at 3 inches. The slate card stock was hand cut and both of these pieces as well as the finished card were sponged in Outdoor Denim Ink. I can't take credit for this design! It comes from Operation Write Home, a fantastic way to give back to our nation's armed forces by sending blank cards so they can write home! They have over 150 different card sketches for download. While that is fabulous enough....each of the sketches includes the dimensions! This makes them so easy to do!

I was so excited about this month's hop and knew exactly what I was going to do with the Tommy Paper Pack which has a nautical theme! But then time got away from me and that project had to go on hold {tear} So instead, I decided to make a Later Sk8r card with one of my favorite A-size stamps!
My Later Sk8r project!
Ok, so Later Sk8r is the PERFECT paper for boys: Gears, Sk8boarding.....but all my nieces are, well...nieces! But the colors in this are so great that they work for so many different projects! I can imagine using these sheets for any athletic or adventure scrapbooking or even with the blues for some accents on a beach page! But in this case I used the paper for a simple but stylish card with my furry friend from Cozy Cat (A1140). Which is so affordable at $6.95!

Paper piecing!
 I wanted to give some dimension to the cat so I stamped the image 3 times. Twice on the dotted paper{Shhh! Don't tell anyone! That paper comes from the Claire Paper Pack} and one time on the plaid paper. Then I fussy cut the images out and layered them. You'll notice I have 2 layers on the body and the third layer is the nose! These were popped up with our fabulous foam tape. I like the tape for just this kind of project where I need really small pieces and a few really long ones to add stability. I used a marker to color in the nose and collar and a small sparkle for the charm.
To add just a bit more bling, I adhered the Green & Blue Epoxy Bubbles (Z1806) which work perfectly with this paper pack! For only $3.99 they pack a great punch that doesn't knock out your pocket book! Looks like need to reposition one of them to straighten them out!
Card Base and Inspiration
 Normally I wouldn't talk a lot about the card base but I think this one is pretty cool! All of it comes from the Later Sk8r paper pack! The top strip is the Outdoor Denim card stock~which is another thing I love about our paper packs-no guessing! The card stock that coordinates is right in the pack! The middle strip is the zip strip from one of the sheets but I actually cut it wider than the strip so it included some of that beautiful blue. The bottom is another texture paper which looks like the metal groves from inside a truck bed or some tool boxes. Finally the slate and pear pieces that were layered on top are at the size. I cut the circle using my Cricut Art Philosophy{heart}and CCR. I cut the circle at 3 inches. The slate card stock was hand cut and both of these pieces as well as the finished card were sponged in Outdoor Denim Ink. I can't take credit for this design! It comes from Operation Write Home, a fantastic way to give back to our nation's armed forces by sending blank cards so they can write home! They have over 150 different card sketches for download. While that is fabulous enough....each of the sketches includes the dimensions! This makes them so easy to do!
 Another note of inspiration
The idea of paper piercing the cat came from Allisa whose card I spotted on Pinterest! She is another CTMH consultant that does amazing work! You can go to her inspiring blog by clicking here. It will take you right to the Cozy Cat card!
A huge thank you to both OWH and Allisa for your designs and ideas!
And of course, I couldn't let this opportunity go by to show you my feline inspiration as well!
This is Baby, a stray that came into my garage over 10 years ago as a tiny little kitten. She is now quite at home on my bed! She is just one of 3 cats who live with someone who considered herself a dog person! These independent, yet loving creatures can sneak up on your heart!

Speaking of Pinterest, I'd love it if you followed me there, on Facebook(click the link at the top left on this blog) or joined my blog!
Thanks for stopping by! More inspiration awaits on Cindy Fowler's blog!
Sharon