Sunday, February 24, 2013

March Madness!

March Madness Special Offer!

With every order of $50 or more (before S&H) I'll send your choice of an ink pad or marker set from CTMH for FREE! Just join my March Madness gathering on my Online store here before March 6th. Then email me your selection of ink pad or marker set! I'll mail you your FREE gift and you'll be stamping or coloring up a storm!

Ordering $250 or more? Then you need to:

Jump for Joy!

Contact me about being your own hostess and getting extra rewards! CTMH has a great promotion for the month of March where your rewards hop up a step on our rewards ladder! That means more great products for free or reduced prices!


Sunday, February 3, 2013

Flower Pot Meets Easel Card: Blooming Spectacular!

Get Well Card

A friend of mine was recently hospitalized for knee replacement (see more at bottom of the post). I was told by another friend of hers that she wanted flowers for her hospital room. I decided right there and then that I would have to give her a bouquet in a card! The first card that came to mind was a flower pot card. I've seen so many beautiful examples by my fellow CTMH consultants but had never created one. I found a tutorial on  Splitcoast Stampers. But as soon as I cut it out I knew it was going to be too small. It was then I decided to combine this pocket card with an easel card. Not only would that enlarge the size of the card, it would also allow for it to stand up so my friend could see it from her hospital bed. Perfect!

 Blooming Spectacular!


 Close to my Heart paper packs make this so easy for all the colors to go together flawlessly. This one is a retired paper called Florentine. No matter, any pack you choose would work beautifully!
The flowers were cut from the Art Philosophy cartridge. Which is my personal fav!
TIP: To make sure that flowers layer and don't just frame, cut 1/2 inch increments! Or do what I did, and look at a coordinating stamp set: Hooray Bouquet!

I really didn't plan to use the stamps since I was cutting on boarder and texture paper but I loved the shapes and knew those were the cuts I wanted. Having the cut sizes right on our stamps just shows we live up to our motto of making it simpler!  I did stamp one of the Hooray Bouquet's flower centers on scrap twilight blue card stock in Denim Blue ink and attached it the right flower. I also edged all the flowers lightly with a sponge in the same color. One flower has a sparkle brad from my stash and the last one is embellished with a Pewter Badge Button. I think these added just the right touch to the flowers.  Foam tape was used to pop up the layers of the flowers. I also slightly bent the petals of the flowers to give them more dimension.

Art Philosophy Cuts

All my cuts are done on Cricut Craft Room so I have some strange numbers. You can easily round if you are using your machine only!

Front left flower: cut at 2.75, 2.194, & 1.25 inches
Front right flower:
Background flower: cut at 2.25, 1.75 & 1 inch
Tag: cut at 2.056 


Before attaching the flowers to the slider panel for the flower pot, I glued them together using Bonding Memories glue in just a few overlapping places. Then I glued it to the front of the slider. Don't glue down the bottom petals of the flowers to the slider! Or you won't be able to have it slide all the way into the pot. I made sure I slid it into the pot a couple times and drew a line on the front of the slide to note where NOT to put any glue.
I've included a picture of the back of the slider just so you can see it. You could always add some stamping or paper to finish it more if you like.

Card front


After creating the flower pot, I covered it with our paper.  Using cut sizes from the easel card tutorial I cut a square of twilight blue card stock and stamped it with a wood plank background from our Universal Background stamp set. I used Denim Blue for the ink. The flower pot was then adhered to the card stock. I attached the tag using our foam tape after stamping Thinking of you from Casual Expressions stamp set. That set has fabulous sentiments for all types of cards, gifts, and scrapbooking. Oh, I forgot to mention how I decorated the top of the pot! I used the zip strip from the paper pack. I'm always amazed at how many ways those little bonus designs can be used!

Slider and inside of easel card!

The cool thing about this card is you can include several sentiments. On the slider I used three different stamp sets: A Blossom for the phrase, For Every Occasion has GET Well, & Words of Comfort for the petite flowers and where I got the inside Love and Hugs sentiment!  

Since I did stamp in this smaller space, I used the inside of the easel for my friends and I to sign our get well messages! 
In the photos below you can see that I also added some coordinating paper from the pack to make it a bit more finished on some of the folded areas. 
To hold the easel up you must attach some ribbon, card stock or dimensional. I choose to continue the flower theme and add our fantastic Colonial White Rosette Ribbon. Our ribbons are such a great value at 5 yards for $7.95! 
All of the card sides were edged in Denim Blue ink. This card was bigger than your typical A2 card so plan on making your own custom envelop.

More than just a hobby!

My friend, Shirley is now in rehab. She is overcoming a wound infection and working with her OT and PTs to soon Kick up her Heels! Your prayers for her continued healing would be appreciated.
She tells me she has had lots of compliments on the card and shown it off to her medical team! While the compliments are great, I am reminded how our crafting can add so much joy and support to those around us even when we can't be there with them. What a great hobby we all share!
~Sharon

Free Idea Book

Close to My Heart has just launched its new Spring/Summer 2013 Idea Book! There are great ways to save time and money by purchasing our coordinated papers and kits! 
Want one? Purchase $50 from online shop and I'll send you your very own Idea Book for free!
Purchase $70 and you can pick out a free ink pad or marker set. Just email me your choice of colors.
Have a fiesta with paper and celebrate your friends and family in your crafting! Check out our great new products or purchase a few old favorites from my online shop:


Don't forget to like my Facebook page!


Friday, February 1, 2013

Green and Smokey Plum Card Set


This fantastic card box and set was fun and easy to put together using CTMH card stock, stamps, ink, and the Artiste and Art Philosophy Cartridges. This color combination is so elegant. All the cards are A2 sized cards made by cutting a sheet of daisyl white cs (8.5 x 11 in.) in half.

This first card was made using a card base stamped with the script background using 2nd generation stamping. (You load the stamp, stamp off on a scrap sheet and then on the card base to get a lighter stamp.) The tag, dress and flag were all made using the Artiste cartridge. All measurements are in inches.

Artiste Cartridge Cuts 

Tag~page 32 Accent 1;  cut at 5.3 
Dress~page 42 Accent 2 Shift; cut at 3.5
Banner~page 58 Accent 3 Shift; cut at 1
Inside of the card
Larger tag~page 32 Accent 1; cut at 4.6 
Smaller tag~page 32 Accent 1, cut at 4.2 

Art Philosophy Cut

Flowers~page  cut at 7.36 for inside of card, .5 for dress

Our white core card stock works great for tearing and embossing. I measured the width of the tag where I wanted the plum cs and I cut a rectangle of plum cs embossed it using my BigShot and a CuttleBug embossing folder. Then I tore the edges. Treasured Friend is from a SOTM and is a completely straight stamp but I curved it on my block to match the curves in the banner.  Try that with other kinds of stamps! On the inside I did some random stamping and stamped the dress from our  Pun Fun stamp set on patterned paper.

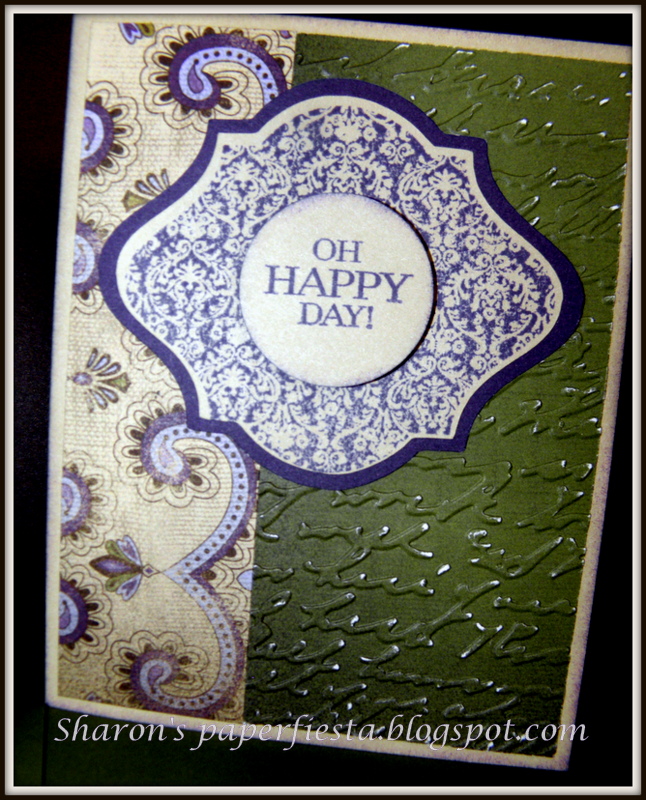
Oh Happy Day!

This card was made with the Perfect Fit Frames and cuts from the Art Philosophy cartridge. The stamp set tells you the perfect size to cut so the stamp set will fit and I just cut .25 inches larger for the background layer. I know some customers and consultants wish we had punches but at anywhere from $10-$30 per punch or frame set from other companies for at most 3 sizes, we get hundreds of shapes in almost any size you want. Now that is value! 


Random Stamping

This card uses random stamping for the background. I folded a daisy white card base and random stamped the top 2/3s of the card using Love Blooms acrylic stamp set. It is a 2 step stamp set with shade stamps and outlines. I used the smaller rose for the background and a combination of small and large for the accents. The accents were stamped, trimmed by hand and attached on top of a strip of plum card stock strip with foam tape to add dimension. The Happy Birthday sentiment came from one of our great Card Chatter stamp sets.

 I love our how-to book!

This card came straight from the Make it From the Heart book. The stamp set is called Beautiful Friendship. It was stamped 3 times on different color card stock and then trimmed by hand to make the 3 layers which are popped up with foam tape. The flag was cut using the Art Philosophy cartridge. This how-to book is an excellent resource for both cards and scrapbook layouts!


Box it up!

The box was created using 3 decorative cuts from the Art Philosophy cartridge. The center flag was quickly cut using my paper trimmer. I've made lots of card boxes in my time but this was one of the easiest!  I got the tutorial from Tracy here. It was so simple to make from a 7.5 x 11 inch card stock! Thank you Tracy!


Close to My Heart has a brand new Spring Idea Book with fabulous new papers, stamps and embellishments!

Want a FREE Idea Book? Submit a $40 order on my online store and I'll send you a catalog absolutely free!

You have blessed me by coming by and checking out my cards! I hope these have inspired you to get into your craft room and start partying with paper!
If you haven't already, please follow my blog and like me on FaceBook!

Thanks for stopping by! ~SHARON 


Friday, January 11, 2013

Lagoon & Cocoa Cards and Portfolio


Here is a set of cards I recently made for my neighbor. She wanted some gifts for some special friends. Artiste and Art Philosophy Cricut Carts and CTMH coordinating stamps and embellishments made creating these cards so easy!

The Happy Birthday and You Touch So Many Lives cards are swing cards from p. 52 Accent 1. The swing card layer shapes are from Art Philosophy p. 62 oval 5 and p. 67 shape 10 respectively. For both cards I cut 1 shape slightly smaller in daisy white for the inside sentiment. Also, to help me with the stamping, I cut my shapes a bit bigger than the stamp set suggests. This gives me a bit more wiggle room. The sweet little bow is one of my favorites! It is found on Artiste page 55, Accent 3.

The third card is also from Artiste (p. 49) and I added the layer on the belly band. The card was embossed using a Sizzix embossing folder and my Bigshot! A quick sanding with the CTMH sanding block and the embossing really popped!

 Just Blooms Paper Shapes

Take a closer look at the Just Bloom Paper Shapes (Z1709 & Z1710). I love how CTMH has matching & ink able paper shapes. The lagoon flowers were ready to go but I did lightly sponge the small butterfly to show the texture on the wings. A few brads helped to put the flowers together. These were adhered with Liquid Glass which is a great thick glue that can hold heavy pieces. In the lower corner you can see some more embossing. This is another Sizzix folder with sweet flowers. In the photo below you can see the inside of the card. Again I lightly sanded the embossing to have our white core show through.


Another look at the set

The Hello card was made by hand with the "Hello" and swish cut using the Cricut. The swish came from the Art Philosophy cartridge p.60 font layer. The flowers were stamped and cut out by hand. The card base was embossed using a Cuttlebug folder. The corners were rounded with our punch.

The folio was a simple sheet of card stock embossed, scored and folded. You can find the tutorial video for this fast folio here. This one is by Dannie Graves and she does a great job of explaining how to make this. I didn't use any ribbon on mine. I only used brads to hold my pockets. But the process is the same. That's why I love crafting! You start with one idea and can make it your own. 

Thanks for stoping by and seeing my card sets. Take a minute to join my blog and my Facebook page so you don't miss out on any projects.  I'll be posting more card sets soon using Green and Plum. Come back and check them out! 
Also, if you are interested in trying out Close to My Heart products, I'd love to be your consultant! I'm here to help you get the most out of your supplies and materials. No matter if you live in South Texas or  Alaska, I'm an email with help and support.

Make every day a Fiesta with paper!
~Sharon


Tuesday, January 1, 2013

La Belle Vie Diva Blog Hop

La Belle Vie Damask Diva Blog Hop

Thanks for joining me after visiting Diahana Barnes's blog. Her thank you card was so pretty! 

There can be no better way to ring in the new year than with a bit of romance and sophistication! That is exactly what La Belle Vie background and texture paper adds to any crafting project. I've found so many uses for this paper pack. From using the pink dotted sheet for shoes and dresses to adding a dark contrast with the black flowered sheet. And if you love the Paris decor trend, then this paper pack is for you!


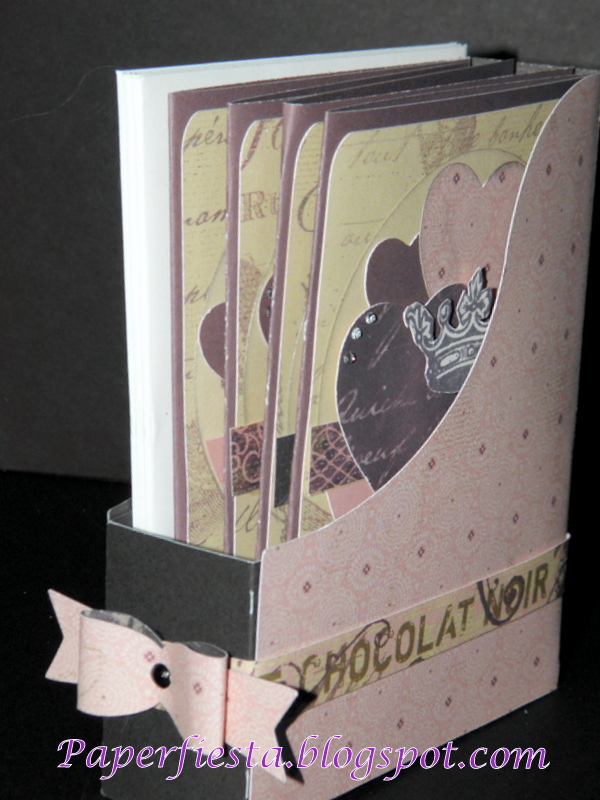
Hearts and Crowns Card Set

 Using both CTMH exclusive Cricut cartridges, Artiste and Art Philosophy, I created this set of 4 cards and magazine box. These cards may look familiar...and they should! You can find similar cards on page 40 of the current IDEA Book. Mine are 3x4 and are portrait oriented. I varied each card just a little by changing the sentiment and location. The magazine box bottom was cut from black card stock and the side and bow from the pink paper. Due to the smaller card size I cut the box smaller. I was hoping I could tell you the cut size but I didn't save it in Cricut Craft Room-bummer:(
The card smokey plum bases were cut by hand but the hears were cut using Art Philosophy. As was the background paper. I used the zip strips to add a ribbon across 3 cards and the box. They come in so handy for this! To give it more dimension I folded some of the strips as I glued them down. you can see that on the Vivre card below.
Card box and 2 cards 

The crowns on the card were stamped on the background paper so the swirls would show. The crown you see is cut out and adhered with foam tape so it pops a bit from the card. The front bow is one of my favorite cuts from the Artiste and can be found on page 55.


Stunning and so simple!


I couldn't believe it when I saw this fancy cut card in Artiste!(p.78, Accent 4). I used Cricut Craft Room so I could layer a frame from Art Philosophy in the center circle. Then I stamped the image on the pink dotted paper and an additional butterfly. I simply cut out the stamped image and glued it on the dark plumb paper and hand trimmed leaving an equal border. Then glued the butterfly body on top of the butterfly image and folded the wings up. I cut a 2-3 inch length of black tulle and tied it in the center with string, fanning the ends out. Using hot glue I glued the tulle to the base and the stamped image I popped up with foam tape. I also added a sparkle to the card to finish it off a bit. This is a stunning card in person but it is bulky so it will definitely be hand delivered.

Happy New Year to all of you crafters out there! And many blessing for 2013.  We are so glad you hopped in to see our projects. If you missed any or just want to hop back through again click here and return to the original Damask Diva and our team leader, Mandy Leahy! Don't forget to visit our Damask Diva team page for a chance at the hop GIVEAWAY sponsored by Melissa Lind. 


Monday, December 3, 2012

It's Christmas time!

Cool Advent Calendar Workshops!

Leave it to CTMH to come up with a faster, simpler, easier way to create traditions and memories for your family at Christmas! Our Advent Calendar Workshop on the Go has it all! The box, paper, cool chipboard frames, and an exclusive stamp set. So easy and yet so fun to put together. 
I decided to make one using the Workshop on the Go kit. I love how it turned out. I didn't add lots of Christmas decorations since I think I'm going to use the box for other count downs with different boxes. 1 chipboard display...many little drawers! I can't wait to make the drawers for Easter!


Santa's little elves!

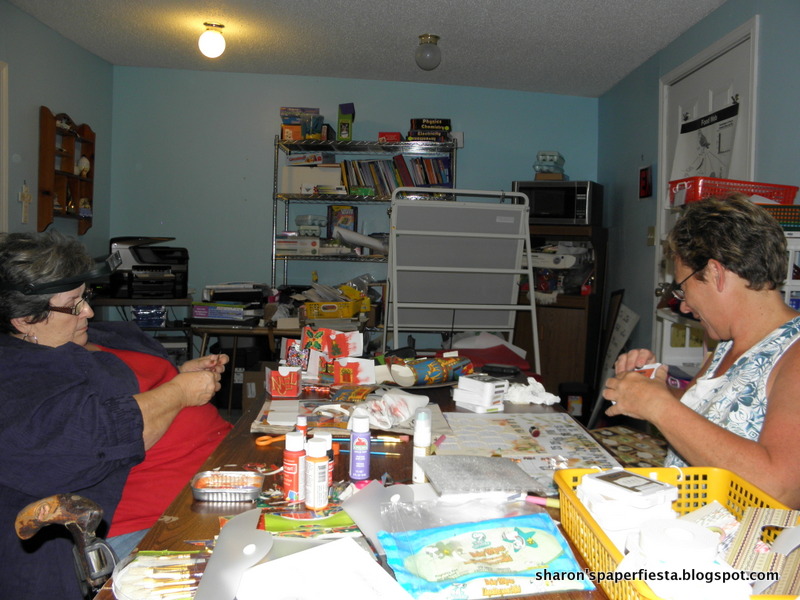
Here are my little elf friends busy working on their calendars!  We had such a great time! They decided to use a variety of papers. Robin bought some vintage looking paper and I cut the boxes and frames using my Artiste Cartridge. This is just one of our amazing Cricut Cartridges. A must have if you like 3D projects and parties.


Shirley asked me to make several daisy white drawers as well as a few red and green. She took pieces of Christmas wrapping paper, paints, gel pens, and practically anything else she could find to create her own designs. She is an excellent painter and I was amazed at how unique and beautiful each box turned out. She is a more free-style creator. Every box has a different feel. You can see a few of her first boxes in the photo to the left. I did cut numbers for her but she also hand sketched and painted some of the numbers herself.

Here is the creative elf herself! Working on her project. Yes, she has her mag-eyes on so she can see the detail. One of my fav craft tools is my set of mag-eyes.


Almost finished!

Here is Robin's very cool calendar almost finished. She sponged each of the frames I cut from the Artiste and the Art Philosophy Cartridge.
I love how well these two carts make creating so much easier. I know some of you would disagree, but I love the ability the Cricut gives me to cut shapes at a variety of sizes to fit any project. I have only a few punches but I just can't see buying a punch or die to cut 1 to 2 sizes. I figure my Cricut has paid for itself and it takes up so much less room than 100+ punches and I have so many more designs just on the two CTMH carts.

 Finished!

It took us a couple nights of fun and crafting but Robin and I got ours done. Shirley is still adding the finishing touches to hers. She has her numbers on and most of the painting done. She now needs to coat each one with Mod-Podge to protect the painting. It won't take her too long. But she is actually just starting. She plans to make little clay and paper animals for a Nativity. Some of them she will even make with the family getting the calendar as a gift. 

Robin has purchased small ornaments and she and her son are adding them to their tree each day.

Great friends made great memories of crafting together and now families are enjoying these calendars that will enhance their Christmas traditions for years to come!
Doesn't get much better than that! I'd love to have you as a customer & a friend! No matter if you are near or far, Ieven FaceTime or Skype to help you craft.

It's not to late! Close to My Heart has several great projects that you and your family could do over Christmas. Check out my new promotion: Whooose Your Valentine which starts on Dec. 13. You get a great Valentine project for $10 with a qualifying purchase of $35. It includes the exclusive stamp set with owls, die cut boxes, and the candy holders! (Swoon!) 
I'd love to have you as a customer & a friend! No matter if you are near or far, I'm here to support you and your crafting. I'm just an email, FB post or video chat away!

Check back soon! I've got several My Creation Stars I'll be posting!
Blessings!
Sharon


Friday, November 30, 2012

Pear & Partridge Hop: Joy to the World!

The Diva's Pear & Partridge Blog Hop

Thanks for making the Diva's hop part of your day during this super busy time of year! If you hopped here from Debbie you are on the right track. If you are starting at my blog, please click here to start from the beginning. You don't want to miss any of the festive Pear & Partridge creations!
Remember to submit your entry for the Diva's blog hop candy on our Diva's page.

Joy to the World!

I love Christmas and I love the Pear & Partridge paper. So festive and yet, I know my scraps will make their way into so many non-holiday projects in the future! One of my all-time favorite Christmas hymns is Joy to the World! My project reflects this joy that my Savior brings me everyday!


My piano display for Christmas!
My Joy rosette center piece will spend many years displayed on my piano or Christmas dining table. This project started out to be a Christmas tree made from rosettes cut from select Pear & Partridge papers. I took a tutorial my sister, Denise, used and revised it using the Artiste Cricut Cartridge to cut the rosettes. But once I put the rosettes together, I noticed that the tutorial called for all the rosettes to be scored at 1/2 inches. The Cricut automatically reduces the scores to fit the size of the rosette. So what I got was a very squatty tree. Nothing like my sister's beautiful one seen here which she made with our very own Pear and Partridge Paper. Didn't see do a great job? 


 I think I could have made it work, but then I saw them layered on each other in 3 piles and I could just picture this center piece and viola! this small disaster turned into something cool!


My this Christmas season fill your heart with JOY!

Here is a close up of the largest rosette. Olive card stock from the paper pack was combined with the B&T papers. The J was cut using the Cindy Loo Cricut Cartridge. The glitter papers were from my stash. But good news is that CTMH will have some glitter/shimmer paper available next catty! Once the rosettes were cut, folded and put together, our foam tape popped up each rosette. After all the rosette stacks were assembled, I colored the skewers using a red Sharpie marker. To get the heights just right I used our Versamat and put each rosette face down at the angle I wanted. Then the bottom line and mat grid helped me keep everything even and straight. It sounds harder than it was! Phew!
I used hot glue to attach the skewers. The O and Y skewers were glued so the excess would be at the top of the rosette; keeping the point for the bottom. I just took my rose pruner and snipped off the extra. Easy-peas-y!
The base for my project measures about 13 inches. The box had old business cards in it and was perfect for this project! I covered the outside with paper from the pack, glitter paper boarder cut using the Artiste, and our Shimmer Trim, which is soooo simple to use! One of my fav products from this IDEA Book. Inside the box I put a Dollar Tree styrofoam piece wrapped with Dollar Tree garland. To finish it off I wrapped a few strips of garland around the skewers, too!

I want to take this time to wish all of you a very Merry Christmas and a Happy 2013! Hope to see you back here soon. Or better yet, subscribe to my blog or join me on Facebook.

Please hop on over to see what Latisha Gilliland has created for you! She's your last stop in this festive hop!

Love and Joy!
Sharon


Anyone purchasing $10 or more through my online business address this month will get this project tutorial and corresponding Cricut Craft Room cut files. Purchases of $50 or more will get a B size stamp set of your choice. Simply click here and join the Pear and Partridge gathering. Then email me your information.