Showing posts with label Art Philosophy Cartridge. Show all posts

Monday, October 21, 2013

Same Cuts So Many Unique designs!

Recently, I provided the activity for a birthday party of a fellow crafter! Christina asked me to prepare an 8 x 10 layout where her friends and family could place a 4 x 6 photo. Isn't that a GREAT idea for a birthday party or ladies day out? I was so excited to do this so I got right to work!

Stella Paper to the Rescue

My first thought was how can I make something that will appeal to all sorts of people? And since 20 ladies were invited, what paper did I have enough of to make 20 sets of materials? The answer, thankfully, was the same for both questions: STELLA, a retired pack from a few years ago that I just loved!{Of course, I just love EVERY paper pack-LOL!}

Now to the design

I needed quick and easy to cut and to put together. But I also wanted something versatile enough that everyone's wouldn't look the same. I ended up cutting the double sided paper down to about 8 1/2 x 10 1/2 inches for the background. The left over from each 12 x 12 Boarder & Texture paper was then cut down into 1 1/2 in strips. Then I used our Art Philosophy Cricut Cartridge to cut a top note frame in cocoa card stock, a flower in the B&T, and from the Artiste Cartridge the word Family. The Artbooking Cartridge couldn't be left out so from there I cut the word Remember. Loving our zip strip, I ended up adding it to the layout also. Here are some of the designs I came up with using these simple cuts.

I love the lagoon card stock and how our double sided paper makes it so easy to change the look just by flipping the paper over. All of these pictured have a brown frame with brown script background stamped on it but I actually also provided lagoon frames and cocoa words in some of the baggies. You can see that I came up with 5 different designs. Not bad...but NOTHING like the creativity of the ladies who came to the party! Take a look at their work pictured below!

So versatile!

As you can see they ladies came up with their own designs that fit their personalities. 8-10 pieces of paper came together in all different ways. Best yet the ladies had a great time and many made more than 1 layout that afternoon. It was a fun filled party with crafting, laughing, a little chismé,  great food, sangria, and margaritas! Who could ask for more!

Color coordinated value!

It is amazing to me the value you get when you purchase one of CTMH's paper packs. 2 sheet of 3 designs Boarder and Texture paper AND matching card stock! That to me is such a blessing! When I first started to craft I'd pick paper packs out at the store downtown, get home and then realized I didn't have enough coordinating card stock. Back to the store I'd go, hoping and praying that one of their packs would work with my project, often spending more money, even with a 40% off coupon. It is such piece of mind, knowing when I open a paper pack up, I'll be able to do several projects with paper that all goes together beautifully. Then add My Creations Stickease or Compliments and your layouts, cards or craft projects will come together perfectly! 

So you like FREE?

Who doesn't like FREE? I have a new club just for you! Purchase 1 Workshop on the Go or Home Decor Kit each month for 5 months and get a FREE gift EACH month from me but that's not all! Learn more here or go to the Monthly Kit Club at the top of this blog!

Thanks for stopping by!

No siesta....Siempre Fiesta!
~Sharon


Sunday, September 22, 2013

Quick ALL Card Stock Card!

Yesterday, parents of former students called and invited me to a family event celebrating their aunt and uncle's 40th anniversary. I accepted their invitation but didn't have an anniversary card ready in my stash. A quick Google search gave me the inspiration I needed! Kim O'Connell had a great card on her blog which I made my own using CTMH's three Cricut Cartridges: Art Philosophy, Artiste, and Artbooking. I used only card stock and the script stamp from Universal Backgrounds stamp set, glue, and some brads from my stash.

Happy Anniversary!


The card base is 5x5 inch daisy white card stock. I also cut a 4x4 inch piece of black card stock and using Cricut Craft Room was able to cut the top note shape out of the center. I also cut the numbers from the black. On another mat I placed red and white card stock to cut out the flowers, ribbon (in both colors: red & white). I had the green swirl (behind the flowers) pre-cut in my stash. Some quick glue, brads, and glue dots and my card was done!

CTMH makes things so easy! Check out more products and craft ideas by going to my online shop: Sharon's CTMH.

Thanks for stopping by!

Sharon

Tuesday, January 1, 2013

La Belle Vie Diva Blog Hop

La Belle Vie Damask Diva Blog Hop

Thanks for joining me after visiting Diahana Barnes's blog. Her thank you card was so pretty! 

There can be no better way to ring in the new year than with a bit of romance and sophistication! That is exactly what La Belle Vie background and texture paper adds to any crafting project. I've found so many uses for this paper pack. From using the pink dotted sheet for shoes and dresses to adding a dark contrast with the black flowered sheet. And if you love the Paris decor trend, then this paper pack is for you!


Hearts and Crowns Card Set

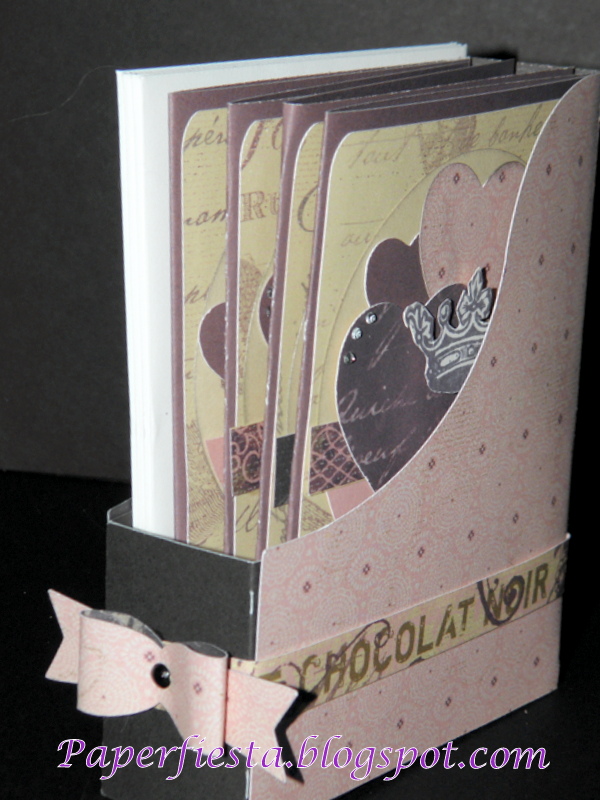
 Using both CTMH exclusive Cricut cartridges, Artiste and Art Philosophy, I created this set of 4 cards and magazine box. These cards may look familiar...and they should! You can find similar cards on page 40 of the current IDEA Book. Mine are 3x4 and are portrait oriented. I varied each card just a little by changing the sentiment and location. The magazine box bottom was cut from black card stock and the side and bow from the pink paper. Due to the smaller card size I cut the box smaller. I was hoping I could tell you the cut size but I didn't save it in Cricut Craft Room-bummer:(
The card smokey plum bases were cut by hand but the hears were cut using Art Philosophy. As was the background paper. I used the zip strips to add a ribbon across 3 cards and the box. They come in so handy for this! To give it more dimension I folded some of the strips as I glued them down. you can see that on the Vivre card below.
Card box and 2 cards 

The crowns on the card were stamped on the background paper so the swirls would show. The crown you see is cut out and adhered with foam tape so it pops a bit from the card. The front bow is one of my favorite cuts from the Artiste and can be found on page 55.


Stunning and so simple!


I couldn't believe it when I saw this fancy cut card in Artiste!(p.78, Accent 4). I used Cricut Craft Room so I could layer a frame from Art Philosophy in the center circle. Then I stamped the image on the pink dotted paper and an additional butterfly. I simply cut out the stamped image and glued it on the dark plumb paper and hand trimmed leaving an equal border. Then glued the butterfly body on top of the butterfly image and folded the wings up. I cut a 2-3 inch length of black tulle and tied it in the center with string, fanning the ends out. Using hot glue I glued the tulle to the base and the stamped image I popped up with foam tape. I also added a sparkle to the card to finish it off a bit. This is a stunning card in person but it is bulky so it will definitely be hand delivered.

Happy New Year to all of you crafters out there! And many blessing for 2013.  We are so glad you hopped in to see our projects. If you missed any or just want to hop back through again click here and return to the original Damask Diva and our team leader, Mandy Leahy! Don't forget to visit our Damask Diva team page for a chance at the hop GIVEAWAY sponsored by Melissa Lind. 


Wednesday, October 31, 2012

Time to Get FLIRTY!

Damask Diva Flirty Blog Hop

Wow! Weren't Mandy's and Ashley's creations fantastic? If you happened upon my blog and missed Ashley's click on her name in blue above.

Now it's time to get Flirty right here! I've created a My Creations Frame with Flirty paper for the covering and flowers. I used Mod-Podge and Liquid Glass to adhere both. The flowers were a combination of flowers from Artiste and Art Philosophy Cricut Cartridges. And of course, every project needs a little bling and so I added the flourishes to each corner.


On the inside of the frame I made a wreath mixing the same Flirty Flowers from a combination of colors that came in the paper pack. The background is the Ponderosa Pine B&T paper found on the back of the flower motif sheet. I then cut the ribbon for the top from the Artiste Cartridge found on page 55.
Anyone interested in the Cricut Craft Room cut files for this project is welcome to leave a comment at the bottom with their email address and I'll send you my files. Be sure to also like my Facebook Page, Close to My Heart PaperFiesta where you'll get to see more projects. Hope to see you on Saturday when I have scheduled a post on how to more easily roll these roses!

You will find a complete list of the hop and a be able to register for our GIVE AWAY sponsored by Gloria Shirr here on our Damask Diva Blog. Now hop on over to Melissa's blog and continue your Flirty adventure!


Blessings and Celebrate Life with Paper!
Sharon